
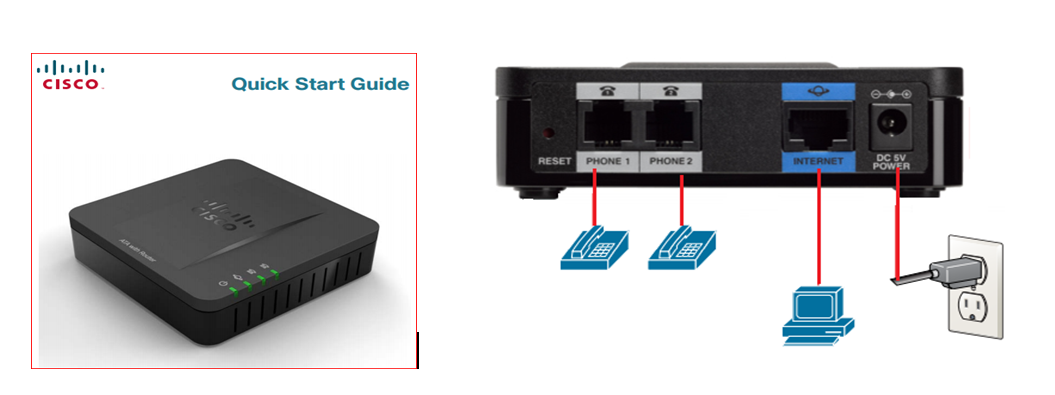
- Connect an Ethernet cable from the blue internet port to your modem.
- Connect your power adapter.
- Connect your phone to phone line 1 and 2 if required.
- Allow for a couple of minutes for the adapter to connect, when you see the phone LED light displaying on the adapter it’s connected.
Pick up your handset and you should hear a dial tone, dial a number to test the phone. If you don’t hear any dial tone restart your broadband DSL modem. You can do this by unplugging the power and waiting 20 seconds then plugging it back on. Also restart the VoIP Cisco adapter (small black box) the same way.
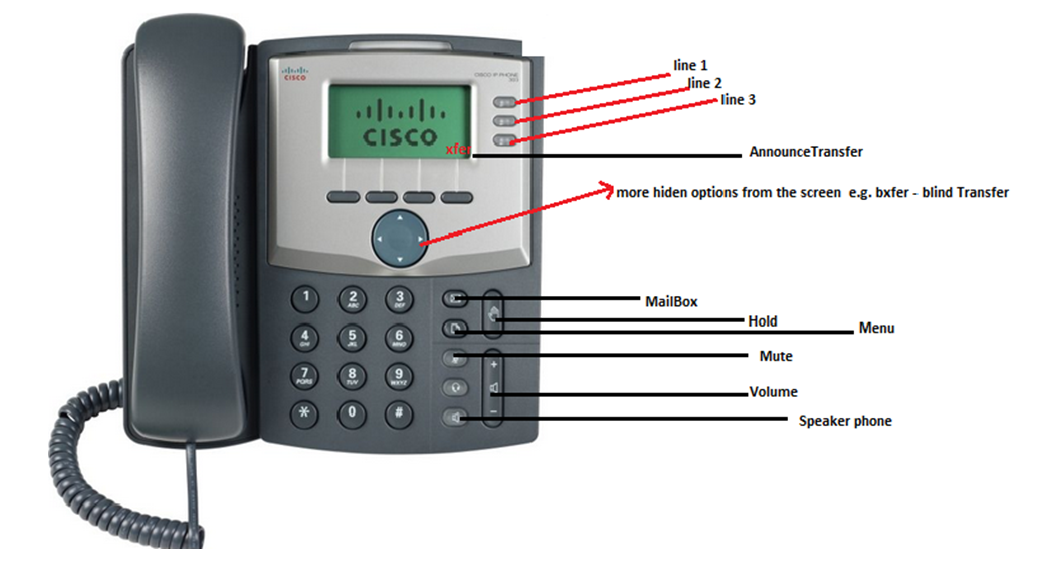
Setting up and using your Cisco SPA 303, 502, 504, 922, 942 IP Desk Phone.

- Connect the power adapter to the phone.
- Connect an Ethernet cable to the port labelled SW to your modem.
- The phone will power up and connect, pick up the handset and dial a number to test the phone.
Initializing Network = The phone is establishing a connection with your network. If it gets stuck Initializing Network check the cables are connected correctly to your modem.
Checking DNS: The phone is checking if it’s connected to our servers through your broadband connection. If it’s stuck on checking DNS restart your broadband DSL modem. You can do this by unplugging the power and waiting 20 seconds then plugging it back in. Also restart the VoIP phone the same way.
Kiwi Internet VOICEMAIL
Setting up your Voicemail greetings
From a Kiwi Internet Phone – Simply Dial *55 from your Kiwi Internet Phone and then after listening to any new messages you may have, press ‘0′ to access your greetings settings
Once you press ‘0′ to access your voicemail greetings settings then you can select:
- ‘1′ – To setup your unavailable message
- ‘2′ – To setup your busy message
- ‘3′ – To setup your name
- ‘4′ – To setup a temporary greeting (i.e. on vacation for a while)
- ‘5′ – To change your PIN number (instead of using the Kiwi Internet Live site)
Press ‘#’ after recording and follow the prompts to listen to the recording and save it if you wish.
There are lots of things you can do in your voicemail box such as navigate messages, change folders, move messages between folders, forward messages, play back message details, return a call, place a new outgoing call and more… Here are the main menu options available to you when you connect to your mailbox:
HOW TRANSFER CALLS
Cisco SPA IP phones
An announced transfer is when you speak to the person you are transferring the call to before the call is transferred. This is used for situations when you need to talk to the person about the call.
A blind transfer will transfer the call straight away. The person you have transferred the call to will answer and be talking to the caller.
Performing an announced transfer: Follow your phone manufacturer guide for other type of VoIP phones.
- Press the xfer button while in a call. (the button will only show in a call)
- The caller will be put on hold, dial the number or extension of the person you wish to transfer the call to.
- Press dial, you will hear ringing as the extension is dialled.
- Once the caller picks up, explain to them you are transferring a call. When you’re ready to transfer the call press the xfer button once more.
Performing a blind transfer:
- Use the right arrow key and go across to bxfer or ##.
- Enter the phone number or extension of the person you wish to transfer the call to.
- When you press dial the call will be transferred
How to answer and make a call
Answering a call: To answer calls just lift the handset. If you wish to answer using an attached headset press the headset button (under mute). If you want to answer using the inbuilt speaker phone press the speaker phone button. You can also use the speaker phone at anytime by pressing the button.
Making a call: Dial the number you wish to call and either; pick up the handset, press the headset button, or press the speaker button depending on how you wish to make the call.
YEALINK PHONE CALL TRANSFER PROCESS
Attended Transfer:
- During an active call, press the “Tran” soft key. …
- Enter the ‘Extn’ number to whom you want to transfer the call.
- Press the “OK” button to initiate the transfer.
- Wait until the destination party picks up the call and then confirm the transfer.
- Press the “Trans” soft key to complete the transfer.
Blind Transfer:
- During an active call, press the “Tran” soft key. …
- Enter the ‘Extn’ number to whom you want to transfer the call.
- Press the “Trans” soft key to complete the transfer.
Grandstream IP Phone call Transfer process:
Transferring the call with Speed dial:
- Answer the call
- Press ext that you want to transfer the call to (soft button on the phone –next to the screen).
- After the other person attending the call talk to them and ask if they are OK to transfer the call.
- Press the transfer key on the phone.
- Press the line key that is on hold (it will be flashing on the button) to complete the transfer.
Blind Transfer:
- During the first active call, press TRANSFER and dial the number to transfer to.
- Press SEND key or # to complete transfer of active call.
Setting up and using your Gigaset A510 IP Phone:
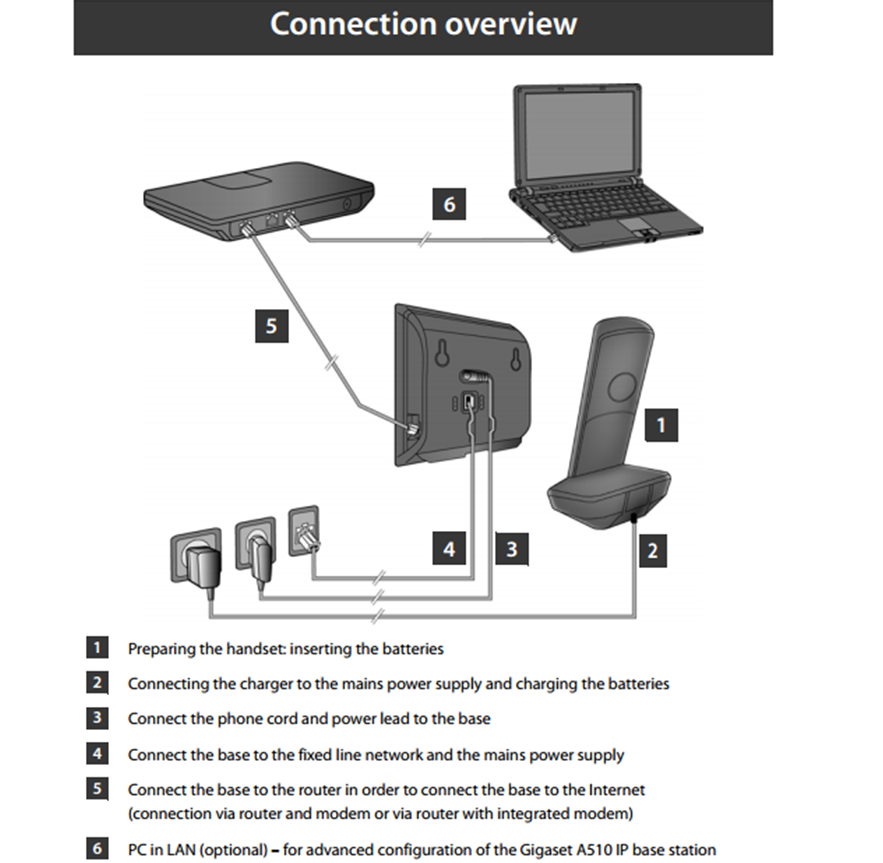
- Connect an Ethernet cable from the base to your broadband modem.
- Connect the power adapter to the base.
- Insert the battery into the bottom of the handset.
- Connect the power adapter to the phone cradle (base).
- Turn the handset on by holding the red button.
Please refer to the user manual for information regarding adding contacts and other functions. (click here for a link to the manual)